It happened. I’m almost embarrassed to say it, but I fell in love with the laser cutter. Although there are many other tools I want to explore, this popped in my head and I had to explore it. This summer I built an interactive photo booth for The Mill. The image was based on the old victorian portraits and I was involved with the lighting, the design and the fabrication of the booth. I guess the image stuck in my head and it dawned on my that I could use the laser cutter to created the portrait and build a light box as the housing. Here’s a black and white victorian style portrait below:

My first thought is I want to find just the right kind of wood and carve a beautiful box, but I realized time and expense are limited things. Since there would be much testing and playing with the laser cutter and image itself, building a box from scratch was too much for this week. I first bought a container store prebuilt bamboo shelf with a lip for the acrylic to sit on. That made me think possibly magnets and a little carved out place to pull it off would be best, but I met with Ben and he suggested a shadowbox. It really is a much better base because they are built so that you can exchange the photo easily, hang it on the wall AND the glass is built in the be held. It can easily be modified to hold acrylic instead of glass.

I have also always worked with LEDs in my circuitry up until now. Since it was Victorian, I felt a warm, amber tungsten bulb might be nice. I even found a cute little bulb and holder that I could wire. Ben reminded me that tungsten gets hot and could melt the plastic. LEDs really would be the better choice. I think when I take this to the next level, I will get LED strips, but I did not have the time to order them right now. I had a few blue LEDs from Tinkersphere I could power with a 9 volt battery and I also had a flashlight on me to test during the process so that would have to work for now.
BUT first I had to prepare the image. Again, I consider this project a bit of a test for future work so I chose quite a few different images online to see how they would look in the laser cutter. I loved the portrait I posted above, but I also found a much more intricate image of a carriage.

Since I am relatively new to fabrication, I’ve been picking brains about best practices. Since these are JPEGs, what is the best way to hold the most detail as I scale up and image trace it in Illustrator? My brilliant friend Jared who owns a print show told me one of his photoshop tricks. He brings the image into Photoshop, changes the image size to the final size desired and ups the resolution — this isn’t a true upgrade on resolution, but it gives you more to work with. Then add a gaussian blur to get rid of a lot of the pixelation around the edges. The final step is changing the contract and brightness to get rid of the noise of the extra grayish pixels. It worked! I prepared both images for the laser!
Since I’ve been very wise with my projects, although I have worked with acrylic before, this was the first time I ever purchased a new sheet — one too big to place as is on the laser cutter bed. SO I turned to another friend and great fabricator for advice, Jesse. John who runs the shop had given me permission to use the band saw — but I remember Ben’s warnings of how it’s not sharp at all. My shadowbox was 6×6 exactly for the acrylic and my sheet was 18×24. If I wanted to have the most possible options, I wanted a clean cut. Jesse’s advice seemed good. He told me to measure the amount I need to break off and tape a metal ruler to it. Then clamp it to the table and take a straight edge to acrylic along the line of the ruler. Once a decent ridge is worked through, Jesse told me I could just break the acrylic.
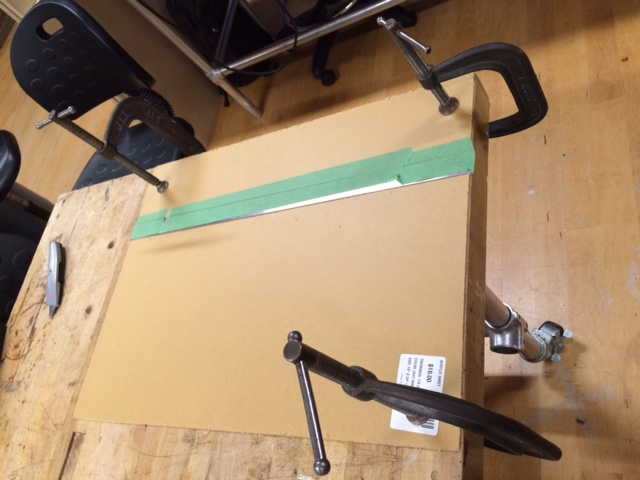
After working on it for a while with a straight edge, I slid it to the end with the part I wanted to break hanging over the side. I reclaimed the acrylic and carefully broke it along the perfect edge I had created. Jesse was right. It worked! And I had a nearly perfect cut.
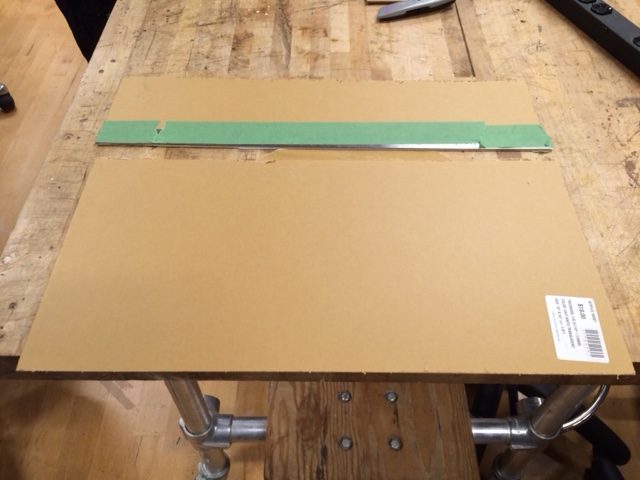
Before cutting the acrylic into squares on the laser cutter, I wanted to test with cardboard. I never cut anything on there without making sure the size is perfect and will fit. I ran it first with cardboard and tested the cardboard in the shadowbox. Perfect fit! So I went onto the acrylic.

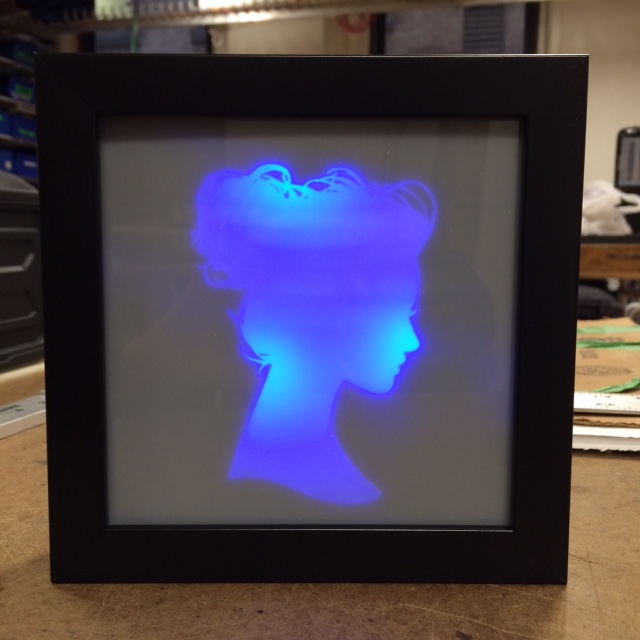
Once I had the perfect little acrylic squares, I needed to paint them black. The goal was to have the laser remove the paint down to the see through white acrylic in the desired design. Then when a light is shown behind it, the image I want to show will glow through the lasered part. Since I had spent a lot on the acrylic for this first prototype, I decided to use free black paint I found in the shop.

It took a few tries to get the paint to go cleanly onto the acrylic, but I used even the badly painted ones as tests. First of all, I do not think this is the paint I would use next time even if I do use paint. But I’m wondering whether there are better ways to do this. I tried two different designs. Here are two of the mistakes that can happen below.

This one I decided to run at 600 DPI which meant that I dropped the power setting a little bit lowered as recommended by the sheet. On the above image, I ran it through three times. Eventually it would have removed all of the paint, but I noticed a rippling effect that also retained some of the darkness form the paint. Someone suggested it was the laser melting the acrylic. This would make sense because it dries in waves and retains a bit of the paint. I decided on my next one to try it at 300 DPI. It would remove it faster and at the lower DPI, the power setting is even higher. I was curious what this would do. Below is an image done that way. I believe at this point it went through five or six times, BUT somehow it moved slightly on one pass so a slight double edge is evident.

The different DPI still did not get rid of the ripple affect. I am not sure if it’s the choice of paint or if it it is because it has to remove so much paint. This made me talk to Ben and brainstorm about other options. In the future I might carve just an outline out of the portrait or whatever the object is. Then peel the paper off the outside and paint using the paper as a stencil. OR Ben mentioned the vinyl cutter which I know nothing about, but am now excited to explore.
I never achieved the final result that I wanted — at least not yet, but I definitely made headway. I also found that because the only bulbs I had to fit in the shadowbox were three, blue LEDs, when I played with their positioning, I was able to get an interesting effect. I originally pictured it as a solid, diffuse light like a bright light box, but maybe the images can be enhanced by the placement of LEDs. And I also found the blue added something interesting to the project as well. This will definitely be something I continue to play with in the future.